Goodwill Dresser Makeover

I always love to hunt for hidden gems/finds at Goodwill, and recently I was able to finish this chalk paint dresser makeover:

 I had just attended a "vintage" sale and had been gawking the many chalk paint creations: frames, side tables, buffets and dressers...when I decided to stop at Goodwill.

 We knew we were going to be moving in a month or so, and I had visions in my head of a house I get to decorate that is mine.

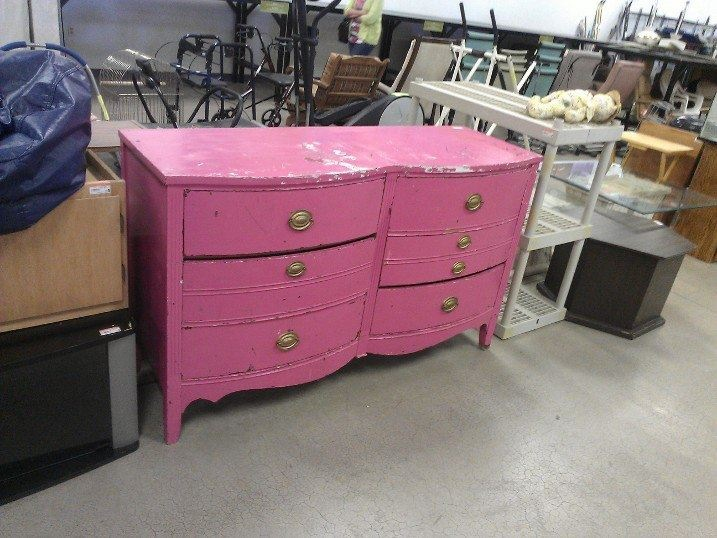
I walked around nonchalantly and this pepto-bismol-colored creation called my name.

I went straight to the cashier and paid my $29.99 to buy it. I excitedly snapped this picture with my cell phone, not even realizing I had just bought furniture for a house we didn't own yet, and without my husband's input....a rare accident, but it happens.

On the way home I informed my husband that he would be needing to pick up this awesome dresser I just bought, and let's just say he wasn't overjoyed about me having ANOTHER project.

Once it was home, and upon further investigation, I discovered it had obviously belonged to a crazy teenager who thought it was smart to write all on the drawers the names of the things she was going to have inside..."socks" & "pants" apparently belonged in the bottom drawers.

It had been painted with many coats of spray paint and more...varnish..stain..pink...green...you name it.
The drawer pulls were interesting and pretty in their own way...I have a "thing" for ovals, and loved the feel they gave to the drawers. Too bad they were covered in nasty pink and gold spray paint- and one was missing.


Steps for the Makeover 

1) Remove drawers, handles and paint

I pulled out each drawer and removed the handles. Lucky for me, my parents decided to visit, & being 6 months pregnant, I let my mom strip as much paint as we could off of the surface of the dresser.

 We focused on the lumpy parts the most, removing many layers of paint, and gave it a light sanding to smooth it some.  In reality, using chalk paint hides a lot of imperfections. Getting every bit off wasn't vital, but I wanted to give it as good of a surface as I could before painting.

Something about the pink spray paint on the top was very stubborn. It was not coming off and was not lightening in any way. Knowing how pinks/reds can bleed through, I used one quick coat of primer on the top. The pink on the sides/front of the dresser was much easier to remove.

2. Picking paint

I recently read TwelveOEight's post about her homemade chalk paint and I gave it a try.
Wow! How awesome and easy it was to make this homemade version of chalk paint.

In a plastic container, I mixed 3-4 tablespoons of plaster of paris with 1/4 cup of water.
I poured that mixture into 1 1/2 cups of Olympic FLAT Premium Interior latex paint ( color: Spice Delight)
After stirring well, I began painting! 

In the end, I used a full quart of paint to cover the entire thing with 2 solid coats. The outcome was a smooth and matte finish...chalky in appearance and very easy to touch up if I ever wanted to. 
I chose not to distress edges/corners because there were some parts where not all of the pink would come off. 


3. Added a molding to 2 drawers

If you notice from the original photo, there were 2 gaps. I initially thought this was just because the drawers were in the wrong places, but later realized they had actually broken off. 

I inserted the drawers thinking it wouldn't be a big deal to have gaps, but since it was painted cream, the gaps were even more exaggerated.

 
We attempted to find a molding as close to what was already on there, and we soaked the pieces in a bathtub of water overnight to soften them.

The next day, we carefully nailed the malleable molding on the bottoms of the 2 drawers. We patched any gap between the molding and drawer with wood filler, and solved our problem. 


4. Added drawer pulls

We reused the 4 large oval pulls that were originally on the dresser. I found the other 4 pulls I loved at Hobby Lobby, and after removing the gold on the oval pulls, we used acrylic paint to match the color of the oval pulls to the others. 

Thanks to the help of my parents and husband, I was able to make something from a discarded piece handiwork that someone thought was junk.

This dresser is solid wood, with dove-tailed drawers...at one time, someone was proud of it. Now I can be.
It was nice working on this project with my parents. Its not often I see them, much less work on projects with both of them. I even think my husband is a tad impressed with how it turned out.

For the decor: a mix of things I have had growing up, things I made, and things given to me by family. The silhouettes are my newest buy with our recent trip to Disneyland.

Thank you for reading my blog! I would love to hear any questions/feedback you have, as well as have you as a follower on Facebook! Thank you


Linked up at:
Whipperberry
My Romantic Home
French Country Cottage
Redoux Interiors
The DIY Dreamer
Photobucket